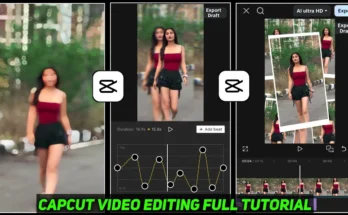
How to Do Auto Camera Tracking Video Editing in CapCut
Hello guys, how are you all doing? In today’s tutorial, I’m going to show you how you can do auto camera tracking video editing inside the CapCut app. The best part is that you don’t need to buy a special tracking camera anymore—CapCut now gives you this feature with just one click. So, make sure you read till the end because I’ll explain everything step by step in detail.
Why Camera Tracking is Important
Camera tracking helps keep your subject (face, body, or even hands) centered and stable in the video. Normally, creators use advanced cameras for this, but now with CapCut Pro, you can achieve the same result easily. This makes your videos look more professional and engaging—perfect for Instagram Reels, TikTok, or YouTube Shorts.
Step 1: Install CapCut with VPN
If you don’t already have CapCut installed, go to your app store and install it. Some features like CapCut Pro may not be available in all regions. In that case, you need to connect through a VPN. For example, you can use Poko VPN or any trusted VPN app. Simply open the VPN, connect, and then launch CapCut.
Step 2: Start a New Project
Once CapCut opens, click on New Project and select the video you want to edit. Delete the default CapCut outro if it appears at the end of your video.
Step 3: Enable Camera Tracking
Now, tap on your video and scroll down to find the Camera option. This feature is available in CapCut Pro. Once inside, you’ll see two options: Camera Tracking and AI Movement.
- Select Camera Tracking.
- CapCut will automatically detect your face or object and place a rectangle over it.
- You can also choose to track your body, hands, or any other part of the frame.
- Click Track and wait for 10–20 seconds. The app will process the video and keep your selected object centered throughout.
Note: If you want smoother results, you can adjust settings like rotation, face size, or use the “Fit Canvas” option to avoid any cropping.
Step 4: Enhance Video Quality
After camera tracking, you can enhance your video further:
- Go to Adjust and increase Clarity for a sharper look.
- Modify Saturation, Contrast, and Shadows according to your style.
- Add a slight Vignette for a cinematic effect.
- If you like blue-toned videos, shift the Temperature slightly towards cool.
You can also apply effects from the Video Effects section, like professional intros or outros, to make your edits stand out.
Step 5: Export in High Quality
Once your editing is done, click on Export, set everything to maximum quality, and save the video to your device. Now you have a professional-level camera tracking video without needing any expensive equipment.
Conclusion
That’s it, guys! This is how you can easily do auto camera tracking video editing in CapCut. It’s simple, quick, and powerful—perfect for beginners who want professional-looking edits. Try it out and share your creations with your audience.
If you’re into mobile video editing, you might also like:
That’s all for today’s guide. Stay creative and keep spreading positivity. See you in the next tutorial!
💬 Join our WhatsApp Channel for updates!
👉 Click here to join