How to Create Viral AI Retro-Style Photos for Instagram
Hello guys! How are you all doing? Right now, AI retro-style photos are going insanely viral on Instagram. Almost everyone is editing their pictures in this style, and if you don’t know how it’s done, don’t worry—I’ve got you covered. In this post, I’ll show you how to turn a normal photo into a trendy AI retro-style photo with just one simple prompt.
So let’s get started!
Step 1: Install the ZMI AI App
To edit or generate these types of photos, we’ll be using ZMI AI. Just open the Google Play Store and search for “JNI.” You’ll see the app at the top of the results. Simply install it on your phone. I already have it installed, but you can do it in just a minute.
Step 2: Upload Your Photo
Once installed, open the app. You’ll see a simple interface. Now, upload a clear photo where your face is visible. That’s the most important part—the app needs to detect your face properly. The rest of the background doesn’t matter.
Click on the plus (+) button → go to your gallery → select a clear photo with your face. Once done, click “Upload.”
Step 3: Choose the Model and Paste the Prompt
After uploading your photo, select the “Create Image” option. This will allow you to generate a retro-style image using AI. Now comes the most important part—the prompt.
I’ve already prepared the best prompts for you. Don’t worry, you don’t need to write anything complicated. You can get the exact prompts from our Telegram channel or WhatsApp group (links will be in the description).
There are two different prompts available. The first one will give you one type of retro-style look, while the second one will generate another style. Just long-press, copy the prompt, and paste it into the ZMI AI app. Then hit “Send.”
Step 4: Wait for the AI to Generate
Once you send the prompt, wait for a few seconds. The AI will process your photo and generate a retro-style edit. The amazing thing is that the face remains 100% identical to your original photo—it doesn’t change your facial identity, which makes the results super realistic.
Step 5: Save the Photo
Now, let’s save the generated image. You can either:
- Long-press on the image and click “Save.”
- Or click on the image, and you may see a download icon next to the share button. If it appears, simply click and download.
Sometimes the download option shows up, sometimes it doesn’t. But don’t worry—long-press and save always works. Once saved, the image will appear in your gallery in high quality.
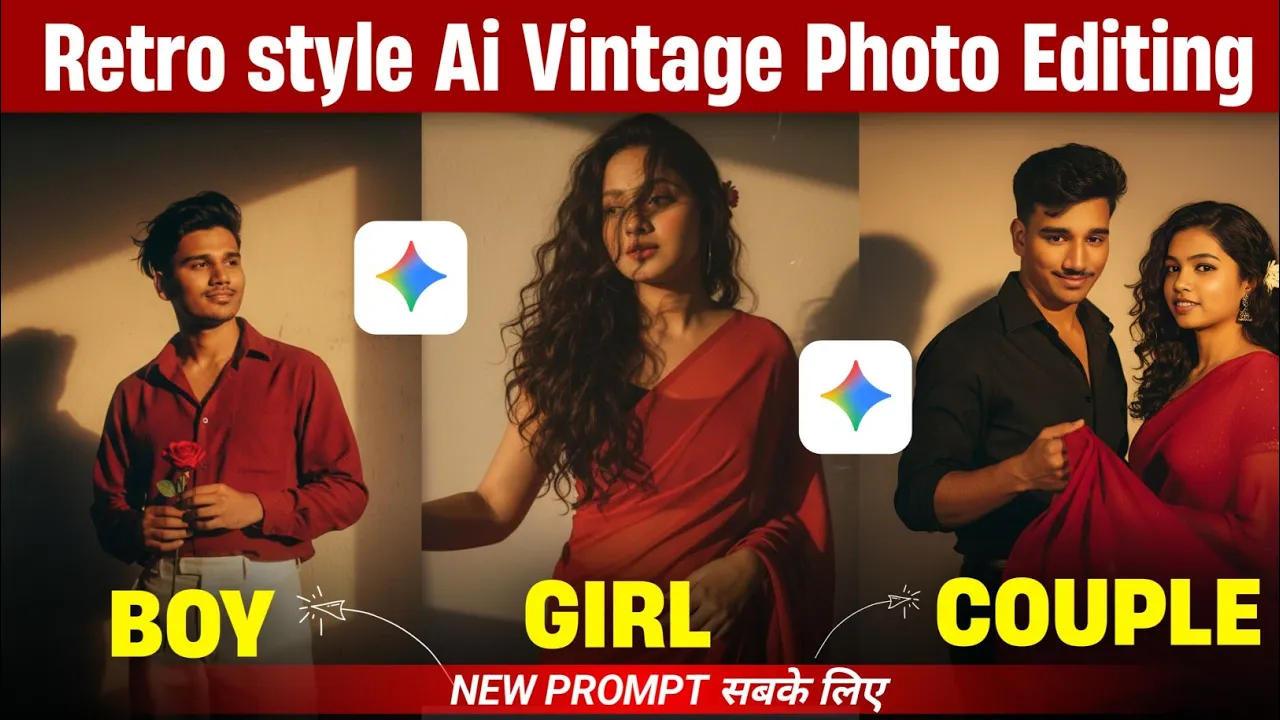
Before and After Results
I tested this myself. A normal photo was turned into a stunning AI retro-style picture with realistic details. The face stayed the same, but the retro aesthetic completely transformed the vibe of the photo. The final saved photo looks crystal-clear in high resolution.
Why AI Retro Photos Are Going Viral
These AI-generated retro photos are trending because they combine nostalgia with modern AI creativity. Instagram loves unique and eye-catching edits, and this style stands out. With apps like AI tools and ZMI AI, you don’t need professional Photoshop skills anymore—just one prompt can give you amazing results.
Final Thoughts
So that’s how you can create your own viral Instagram AI retro-style photos using ZMI AI. Just follow the simple steps—install the app, upload a clear photo, paste the provided prompt, and save your masterpiece. Super easy!
I hope you found this tutorial helpful. Try it out today, and let your Instagram feed shine with these stunning retro-style edits. Until next time, stay creative and keep spreading happiness!
💬 Join our WhatsApp Channel for updates!
👉 Click here to join